
I came across Daily Polka Dots' blog and saw all these cute photos. I love manually editing this photos myself rather than using a phone application to make them all pretty. Here's a tutorial for you. It's really easy!
Open your image
Make sure it's not too dark or pixelated. I find that pictures with a lot of light works the best with this effect.
At the top you'll see the layer tab. Click layer >> duplicate layer
This means you'll have the same image on top of your original image.
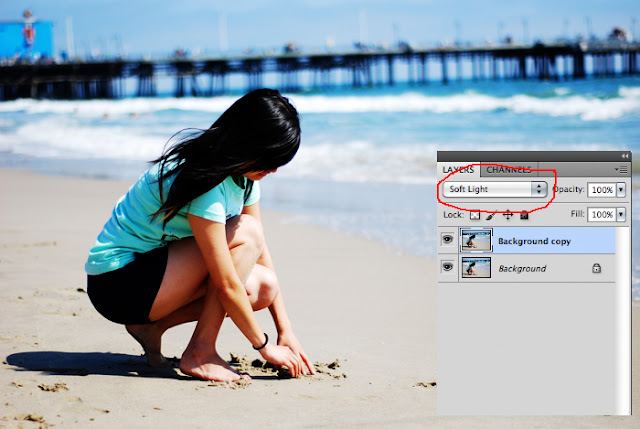
Change the layer setting
Change the layer setting
When you first duplicate your image it should say normal but we will change it to the soft light setting. You're changing the way the layer blends with the other layers.
This will darken your image and naturally contrast the image. You can change the opacity of it but I keep it at 100%. Make sure your still on the background copy layer to continue with the next step.
Right after this go to image >> adjustments >> black & white. You can keep it at default or play around with the settings.

Make a new layer
Go to layer >> new >> layer (shift + ctrl + n for PC) (shift + command + n for macs).
Then click on the paint bucket tool on your right hand side. You can fill in the new layer with a navy blue color (#05144b is what I used). You can pick your color near the bottom (look where I've circled it in red).

Then you'll change the setting from normal to exclusion for layer 1. You can play around with the opacity by keeping it at 100% or adjusting it to even 80% so it's not too yellow.

Make a new layer (shift + ctrl + n).
It should be called layer 2.


It should be called layer 2.
On the right side you need to select the brush tool. At the top of photoshop you can change the size of the brush. Make sure you select a soft round brush like the one I selected.

Pick a bright color like hot pink (#ff048c) and also use a marigold or sunflower color (#f2a011). Paint around wherever in layer 2.
Then you'll change the layer's setting to screen. It becomes bright as you can see below.

You can paint layer 2 however you want. It's up to you where you want to put the colors to get the effect that you want. You can also use bright blues, purples or greens, but I like to stick to the pink and marigold.
This is the end result.

It's not as strong so I decided to get rid of layer 1 (the one with the navy blue filled in).
Select layer 1 and delete it.

Add in some fonts or brushes and then you've got yourself a dreamy lomo-vintage photo.
This was my first tutorial ever. I hope it works for you! I apologize if it's confusing or all over the place. If you have questions on any of the steps leave a comment and I'll be glad to answer you.
woah! Awesome! I'm going to link to this from our photo facebook. facebook.com/thebakersphotography
ReplyDeleteAw thank you! I hope it's an easy tutorial to follow!
Deletethis was so fun! i've been doing this to my pics for 30 mins now ha! thanks for sharing!! have any more ps tricks? ;)
ReplyDeleteAh I'd love to see your results! I'm going to look through some of my old graphics that I'd make and I'll share :D
DeleteI edit all of my Photoshop designs from my little brother. He learn all these from photoshop tutorials but Now I wanna learn that how to use it.
ReplyDelete